If your workplace or school's extra-restrictive internet filter has you pulling your hair out during the occasional browsing break, there's hope! Here's a quick look at how to get around heavy-handed browser restrictions with the open-source PHProxy.
Before we jump into the real playground, lets do A quick crash course on proxy servers: Let's say your dastardly workplace blocks you from reading HackingArticles. Many web filters block web sites based on URLs, so if HackingArticles were blocked, the filter would recognize the URLhackingarticles4all.blogspot.com and automatically block any connection. A proxy acts as a go-between for your browser and the web site you want to access, and as far as the web filter can tell, the proxy-employing user isn't visiting HackingArticles she's visiting whatever the URL is for the proxy. And since we're setting PHProxy on your home computer, chances are slim that the web filter will block your home IP address (or URL, which we'll talk about more below).
When you are done here, you should be able to access the restricted websites by routing your request through your home computer. This article is divided into three steps. It's recommended that you follow the steps sequentially to avoid any sought of hick-ups. First of all we will explain how to setup a Local Web Server on your home computer and then we will take you through another tutorial to setup PHP Proxy server on your self made Web Server. And After that we will explain you on how to access your newly built local web server from any other computer.
How to Install A Local Web Server On Your Home Computer
After the completion of the above mentioned download, you can further proceed to setup a local web server on your home computer. To do this, first install the WAMP in your PC. It's a very basic next,next,....finish type install, so we won't explain that! After the successful installation, you will notice a tray icon in the bottom-right side of your screen. This shows that WMAP is running but it is not turned on. So, we will Turn it on by right clicking it and turning it on.
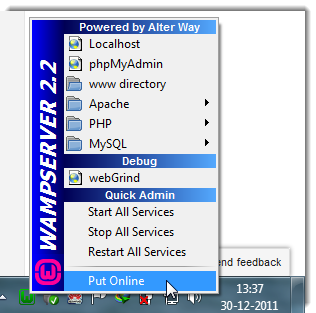
Now, verify if the server is working fine, again left-click on the tray icon and click Localhost, or just open up your browser window and goto http://localhost/ or http://127.0.01 . If everything is working fine, you will see the browser window like this.
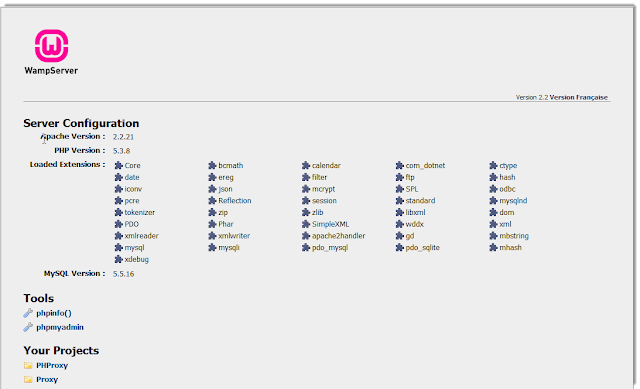
Good work. Now you officially have your own web server up and running on your home PC!
How To Install PHProxy on your web server
Now Unzip the downloaded PHProxy as we are going to install it on WMAP Server. Here, to install PHProxy, all you need to do is just copy the extracted folder and paste it to the root directory of your Web Server.
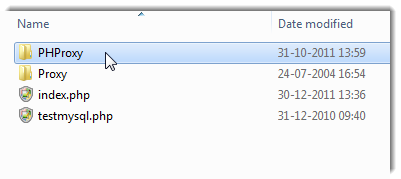
To find your server's root directory on Windows, just click the WAMP system tray icon and click www directory (which, on my Windows 7 installation, is located at C:\wamp\www . Inside this folder you should see a file called index.php that's the page that loaded when you pointed your browser to http://localhost/ above. Now simply take the PHProxy folder you unzipped PHProxy to above and drag it directly inside the www folder.

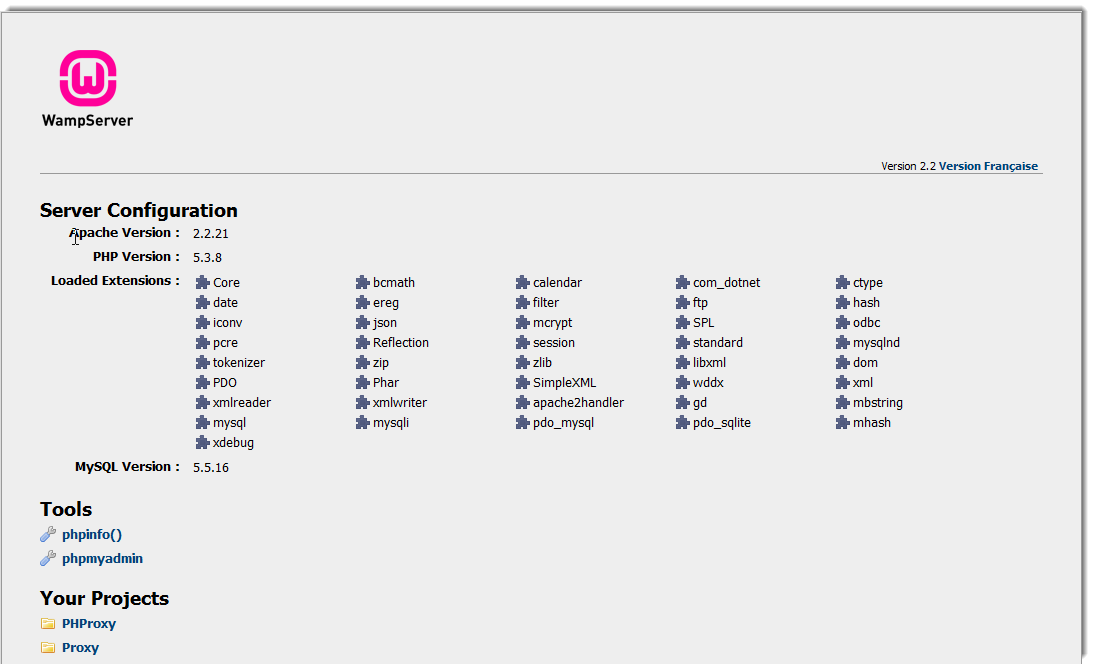
And... there you have it-you've officially installed PHProxy. To make sure it worked, point your browser to http://localhost/phproxy/. You should see the page below.
 To test it further, all you have to do is type or paste the URL you want to visit into the web address input box and hit Enter.
Set Up Port Forwarding
At this point PHProxy should be working fine from your home computer, which is all well and good, but now we need to make it easy for you to access your local PHProxy installation fromoutside your home. To do so, we're going to have to set up port forwarding, then optionally we'll give your PHProxy server a friendly URL.
Set Up Port Forwarding on Your Router: When you try to communicate with your home computer from outside your local network, the request first has to go through your router which then identifies which computer the request is intended for and sends it on its merry way. When you're running a web server on your home computer, other computers looking to communicate with that server will try communicating with it on port 80 (you don't really need to know what any of that means; web servers generally communicate on port 80, and that's what browsers try to access by default). So when your router receives a request on port 80, you need to tell it that those requests should be forwarded to your local PHProxy server.
Rather than providing the whole detail for the different routers, I would rather point you to the website Portforward.com where you can select your router model and tech yourself how to forward ports on it.
If you've successfully set up port forwarding, you should now be able to access your home serverby visiting your network's external IP address (this is the single address that identifies your home to all the other computers on the internet). Quickly point your browser to What Is My IP and copy the series of numbers following "Your IP Address Is:", paste that into your browser's address box, and hit Enter. If everything went according to plan above, your browser should now load up your local server. Add /phproxy/ to the end of your IP address and you should see the PHProxy homepage. Smooth.
Now, as the server is accessible from the outside world, you can browse through your own proxy server and overcome the heavy-handed filters with the proxy server!
Have a nice day!
By Kaila Piyush
My Google Profile HackingArticles4all.blogspot.com
Before we jump into the real playground, lets do A quick crash course on proxy servers: Let's say your dastardly workplace blocks you from reading HackingArticles. Many web filters block web sites based on URLs, so if HackingArticles were blocked, the filter would recognize the URLhackingarticles4all.blogspot.com and automatically block any connection. A proxy acts as a go-between for your browser and the web site you want to access, and as far as the web filter can tell, the proxy-employing user isn't visiting HackingArticles she's visiting whatever the URL is for the proxy. And since we're setting PHProxy on your home computer, chances are slim that the web filter will block your home IP address (or URL, which we'll talk about more below).
When you are done here, you should be able to access the restricted websites by routing your request through your home computer. This article is divided into three steps. It's recommended that you follow the steps sequentially to avoid any sought of hick-ups. First of all we will explain how to setup a Local Web Server on your home computer and then we will take you through another tutorial to setup PHP Proxy server on your self made Web Server. And After that we will explain you on how to access your newly built local web server from any other computer.
Essential Downloads For This Tutorial
- PHProxy
- WAMP Server (It's a web server in which WAMP stands for - Windows Apache MySQL and PHP)
How to Install A Local Web Server On Your Home Computer
After the completion of the above mentioned download, you can further proceed to setup a local web server on your home computer. To do this, first install the WAMP in your PC. It's a very basic next,next,....finish type install, so we won't explain that! After the successful installation, you will notice a tray icon in the bottom-right side of your screen. This shows that WMAP is running but it is not turned on. So, we will Turn it on by right clicking it and turning it on.
Now, verify if the server is working fine, again left-click on the tray icon and click Localhost, or just open up your browser window and goto http://localhost/ or http://127.0.01 . If everything is working fine, you will see the browser window like this.
Good work. Now you officially have your own web server up and running on your home PC!
How To Install PHProxy on your web server
Now Unzip the downloaded PHProxy as we are going to install it on WMAP Server. Here, to install PHProxy, all you need to do is just copy the extracted folder and paste it to the root directory of your Web Server.
To find your server's root directory on Windows, just click the WAMP system tray icon and click www directory (which, on my Windows 7 installation, is located at C:\wamp\www . Inside this folder you should see a file called index.php that's the page that loaded when you pointed your browser to http://localhost/ above. Now simply take the PHProxy folder you unzipped PHProxy to above and drag it directly inside the www folder.
And... there you have it-you've officially installed PHProxy. To make sure it worked, point your browser to http://localhost/phproxy/. You should see the page below.

Set Up Port Forwarding
At this point PHProxy should be working fine from your home computer, which is all well and good, but now we need to make it easy for you to access your local PHProxy installation fromoutside your home. To do so, we're going to have to set up port forwarding, then optionally we'll give your PHProxy server a friendly URL.
Set Up Port Forwarding on Your Router: When you try to communicate with your home computer from outside your local network, the request first has to go through your router which then identifies which computer the request is intended for and sends it on its merry way. When you're running a web server on your home computer, other computers looking to communicate with that server will try communicating with it on port 80 (you don't really need to know what any of that means; web servers generally communicate on port 80, and that's what browsers try to access by default). So when your router receives a request on port 80, you need to tell it that those requests should be forwarded to your local PHProxy server.
Rather than providing the whole detail for the different routers, I would rather point you to the website Portforward.com where you can select your router model and tech yourself how to forward ports on it.
If you've successfully set up port forwarding, you should now be able to access your home serverby visiting your network's external IP address (this is the single address that identifies your home to all the other computers on the internet). Quickly point your browser to What Is My IP and copy the series of numbers following "Your IP Address Is:", paste that into your browser's address box, and hit Enter. If everything went according to plan above, your browser should now load up your local server. Add /phproxy/ to the end of your IP address and you should see the PHProxy homepage. Smooth.
Now, as the server is accessible from the outside world, you can browse through your own proxy server and overcome the heavy-handed filters with the proxy server!
Have a nice day!
By Kaila Piyush
My Google Profile HackingArticles4all.blogspot.com
Posted by R2blog. R2blog auto post for blogspot. Download at http://R2blogger.blogspot.com


0 comments:
Post a Comment